SSH Into Raspberry Pi From Anywhere: Your Easy Guide
Could accessing your Raspberry Pi from anywhere in the world, securely and without cost, seem like a distant dream? The reality is, with a few straightforward steps, you can unlock the power to remotely connect to your Raspberry Pi, whether you're across the room or across the globe, and the journey begins now. Forget the limitations of being tethered to your local network; embrace the freedom of remote access and explore the limitless possibilities that await.
The challenge of remotely accessing a Raspberry Pi often seems daunting, conjuring images of complex configurations and technical hurdles. However, the process is remarkably accessible. We'll delve into the steps required to establish a secure SSH connection, offering insights and practical guidance to ensure a smooth and successful setup. Prepare to transform your Raspberry Pi into a versatile tool, accessible from any location, and discover the power of remote access.
The initial response to wanting to remotely access your Raspberry Pi frequently involves frustration and a sense of being overwhelmed by the technical aspects. Many search queries like "How to SSH into a Raspberry Pi from anywhere?" often yield unhelpful results, leaving users feeling more confused than enlightened. This article aims to address this very issue, providing a clear, concise, and practical guide to enable you to securely access your Raspberry Pi remotely, irrespective of your physical location.
- Polyprincessriri Trending Videos Style Insights You Need
- Is Filmyflypictures Safe Reviews Insights You Need To Know
Let's be direct. To successfully SSH into your Raspberry Pi over the internet, you'll need to carefully navigate a series of steps. Heres a blueprint that you can follow to easily achieve remote access:
First, you'll need to understand the basics. SSH, or Secure Shell, is the bedrock of our remote connection strategy. This robust protocol allows you to securely connect to your Raspberry Pi and execute commands as if you were sitting directly in front of it. SSH encrypts the traffic between your device and the Pi, ensuring that your data remains private and protected. The process, while technically involved, boils down to a few fundamental steps that we'll outline in the following sections.
Before you get started, consider these crucial preliminary steps. Ensure your Raspberry Pi is connected to the internet. This is the lifeblood of remote access; without an active internet connection, any attempt at establishing a remote link will be futile. Note your Raspberry Pi's IP address. This numerical identifier serves as the unique address for your Pi on your network. You'll need this address to connect to it remotely. You can find the IP address using various methods, often by checking your router's administration panel or directly on the Raspberry Pi itself using a simple command.
- Movie Streaming Piracy Latest Updates Where To Watch
- Breaking Daisy Melanins Viral Video Biography What You Need To Know
One of the simplest methods is to create an empty file named `ssh` (without any extension) in the boot partition of the microSD card containing the Raspberry Pi OS. You can insert the microSD card into your Windows PC, and the boot partition should appear as a drive. This small but significant step ensures SSH is enabled when the Pi boots.
Once the basics are in place, you're ready for the next phase: enabling SSH on your Raspberry Pi. This is a critical step that allows you to establish a secure, remote connection. SSH, or Secure Shell, is a protocol that allows for encrypted communication between two devices over an unsecured network. In essence, it creates a secure tunnel through which you can send commands and receive responses. Think of it as a secure doorway into your Raspberry Pi, enabling you to access and control it from anywhere.
One of the most straightforward ways to enable SSH is to create an empty file named "ssh" (without any extension) within the boot partition of your Raspberry Pi's microSD card. This creates the necessary conditions for a secure connection. Once the card is ready, insert the microSD card, containing the Raspberry Pi OS, into your Windows PC. The "boot" partition of the microSD card will then become visible. Within this partition, create a new, empty file and name it 'ssh'. The absence of a file extension is crucial; it's simply "ssh."
Now comes the moment to test. Open the terminal on your local device. Your device could be a Windows computer, a Mac, or a Linux machine. Then, you are to enter a specific command, customized to fit your unique Raspberry Pi and network setup. The command will be similar to `ssh pi@`. Replace "" with the actual IP address of your Raspberry Pi. If the connection is successful, you will be prompted for your password. If successful, you'll have a command-line interface to your Raspberry Pi.
The practical benefits of enabling remote SSH are extensive. Imagine monitoring your home automation system from your workplace. Picture yourself accessing files stored on your Raspberry Pi from any location that has an internet connection. Think of being able to troubleshoot issues with your Pi without physically being present. The possibilities are limited only by your imagination. It also enables advanced projects, such as those involving media servers, web servers, and remote data collection.
To be sure, a basic understanding of networking concepts is beneficial. Familiarity with terms like IP addresses, ports, and firewalls is essential for navigating remote access setups. Your local IP address is a private address assigned to your device on your home network. In contrast, your public IP address is the address used by your internet service provider. Ports serve as virtual doorways, directing traffic to specific applications on your Raspberry Pi. Firewalls act as security guards, controlling incoming and outgoing network traffic. However, these concepts are not an insurmountable hurdle; they can be learned and easily implemented with patience.
Security must be your top priority. As we navigate the world of remote access, well focus on methods that ensure the data that travels between your device and the Pi remains private. We'll consider the use of strong passwords, disable password-based authentication and only use public-key authentication, and regularly update your Raspberry Pi's software to address any potential security vulnerabilities. By implementing these measures, youre not just opening a door to convenience, but you are building a fortress for your data.
Troubleshooting any problem may feel daunting, and so is enabling SSH. Some common pitfalls include incorrect IP addresses or firewall settings. Verify your Pi's IP address to ensure accuracy. Double-check the security rules on your network. Also, remember, remote access is not a set-it-and-forget-it proposition. It demands ongoing attention. Security threats evolve, so a proactive and informed approach to the protection of your devices is vital.
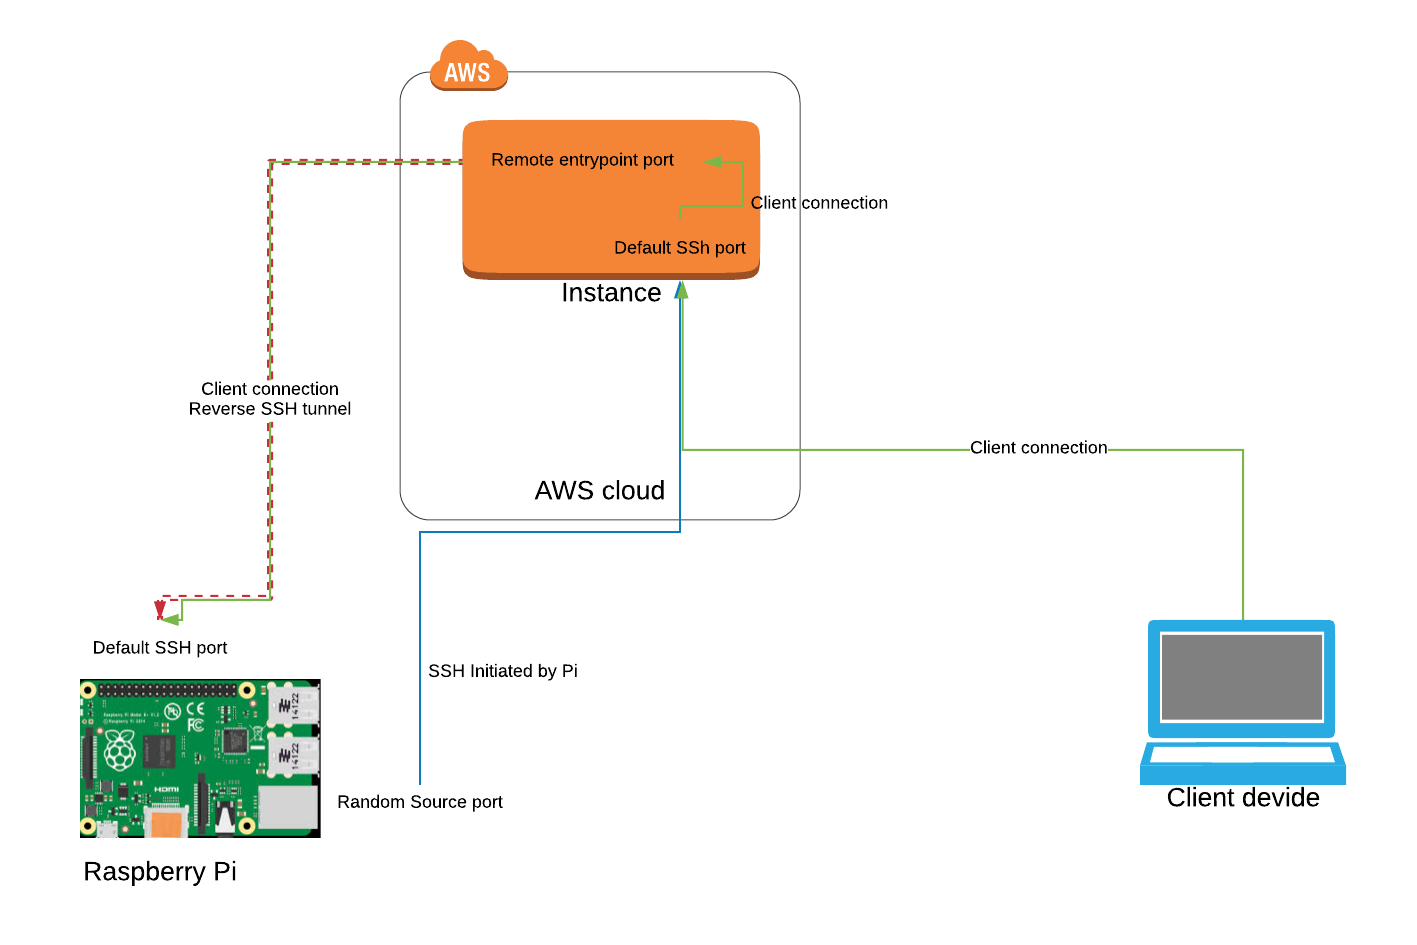
One of the most significant advantages of enabling remote SSH is its ability to transcend geographical constraints. In other words, tunnel in will allow you to SSH into the Raspberry Pi, even if you are not in the same network as your device. Instead, you can SSH into your Raspberry Pi remotely, from anywhere in the world, provided you have an internet connection. Its a game-changer. It opens doors to a world of possibilities. Whether youre traveling, working remotely, or simply enjoying the flexibility of remote access, you'll find SSH invaluable.
You are now ready. The ability to access your Raspberry Pi from anywhere is an empowering prospect. It offers unparalleled convenience and unlocks a myriad of possibilities. The process is simple: by ensuring the internet connection, the correct IP address, and using the SSH file, the task of accessing and controlling your Raspberry Pi from afar becomes remarkably straightforward. This guide equips you with the knowledge and tools to confidently configure remote access and enjoy the full potential of your Raspberry Pi.
Remember, enabling remote SSH isnt just about opening a door to your Raspberry Pi. It's about securing your connection, staying vigilant, and embracing the ever-evolving landscape of cybersecurity. With the steps outlined in this guide, you're now prepared to embark on your remote access journey, confident in your ability to establish a secure and reliable connection. This is about simplifying and making your access secure, and empowering you to fully utilize your Raspberry Pi from anywhere in the world.
This guide focuses on the core steps. Here are some essential security tips to consider:
- Change the default password: Immediately change the default password for the "pi" user. The default password is "raspberry," which is a major security risk. Use a strong, unique password.
- Use SSH keys: Set up SSH key-based authentication instead of password-based authentication. This is significantly more secure.
- Update the system: Regularly update the Raspberry Pi's operating system and installed software to patch security vulnerabilities.
- Firewall: Consider using a firewall on your Raspberry Pi to restrict network access and the ports that are open to the internet.
- Monitor logs: Regularly check the SSH logs for any suspicious activity.
This guide also seeks to equip you with tools and techniques to troubleshoot potential issues. Here are some common challenges and how to resolve them:
- Cannot connect: Double-check the IP address. Make sure the Raspberry Pi is connected to the internet. Verify that SSH is enabled.
- Connection timed out: This could be due to firewall issues. Check your firewall settings on your router.
- Incorrect password: Make sure you are using the correct password for the "pi" user or the user account you are using.
Remote access opens doors to a world of possibilities. Access your Raspberry Pi from any device. Monitor your home automation system. Troubleshoot your Raspberry Pi from anywhere in the world. Now you can enjoy the convenience and the freedom of being in command, regardless of your location.
| Key Aspects of Remote Raspberry Pi Access | Details |
|---|---|
| Prerequisites | Raspberry Pi connected to the internet, noted IP address, and a device (computer, laptop, smartphone) with an SSH client. |
| Enabling SSH | Create an empty file named "ssh" (without extension) in the boot partition of the microSD card. |
| Connecting via SSH | Use the terminal or command prompt on your local device and enter the command: `ssh pi@`. Replace `` with your Pi's actual IP address. |
| Security | Change the default password, use SSH keys, update the system regularly, and consider using a firewall. |
| Troubleshooting | Check IP address, verify internet connection, ensure SSH is enabled, and review firewall settings. |
| Benefits | Remote access from anywhere, monitoring, file access, and troubleshooting capabilities. |
| Cost | Free; relies on open-source software and basic internet access. |
| Further Reading | Raspberry Pi Official Documentation |
- Roberto Esquivel Cabrera The Man With The Worlds Longest Penis
- Desiremovies Risks Alternatives Safety Guide What You Need To Know

How To Ssh Into A Raspberry Pi From Anywhere Using Windows In Rspberry
![ssh into raspberry pi from anywhere [3 easy steps]](https://tunnelin.com/wp-content/uploads/2020/06/raspberry_pi_ssh.png)
ssh into raspberry pi from anywhere [3 easy steps]
How to SSH into a Raspberry Pi running at home from anywhere in the
