Access Raspberry Pi Remotely With SSH & Cloudflare Tunnels
Are you struggling to access your Raspberry Pi securely from anywhere in the world? Setting up a secure reverse SSH tunnel is the key to unlocking remote access to your Raspberry Pi, even when it's tucked behind firewalls and private networks.
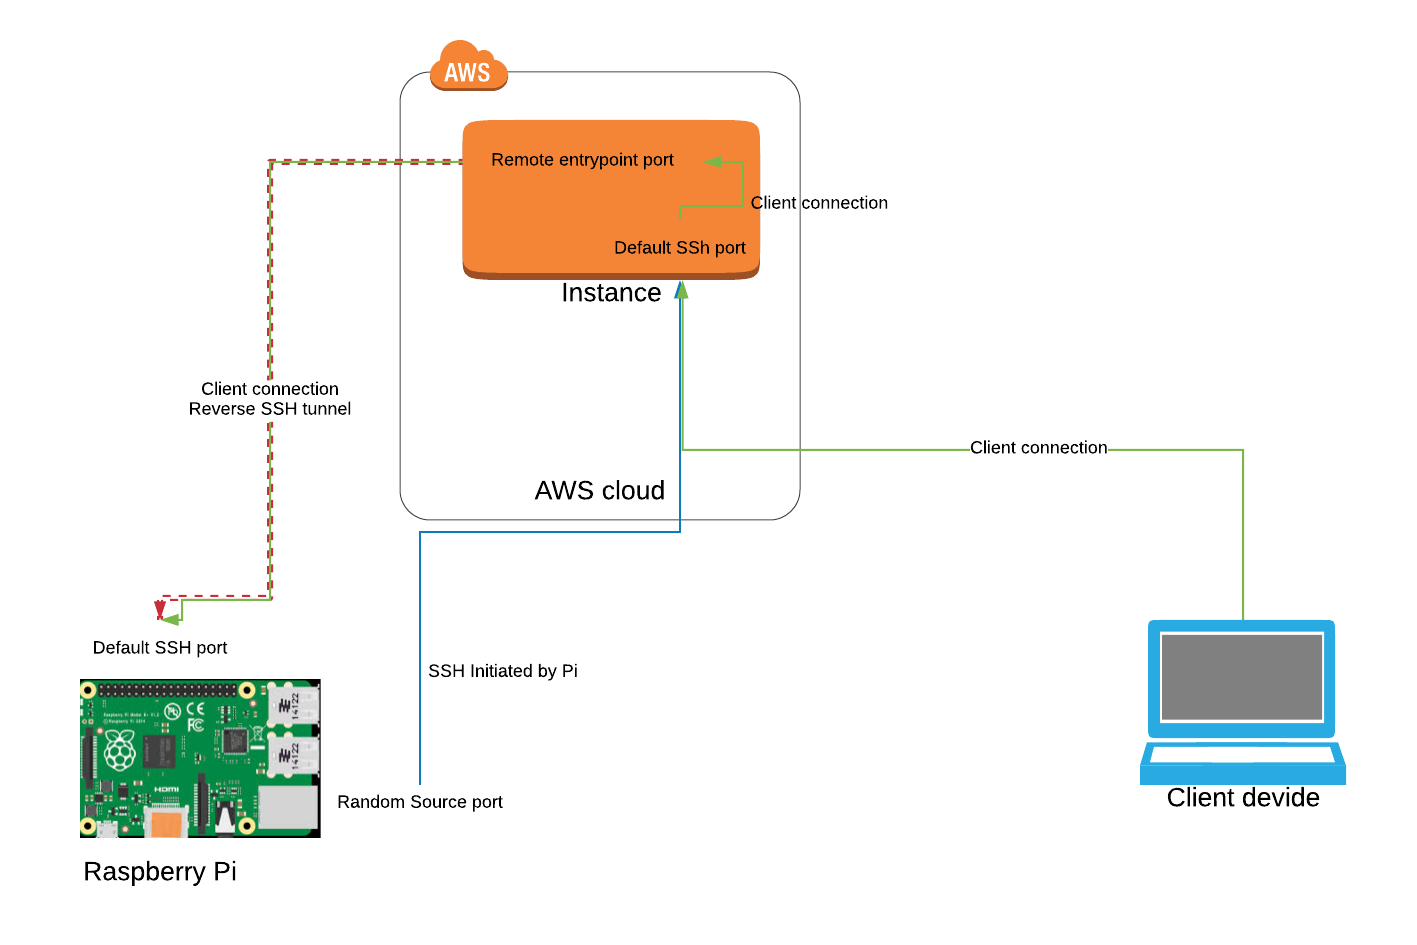
The modern digital landscape presents numerous challenges for those seeking to maintain control over their devices, especially when those devices are located behind the protective barriers of a firewall or a Network Address Translation (NAT) system. This is where the concept of secure reverse SSH tunneling becomes invaluable. It's not just a workaround; it's a robust solution that allows for encrypted communication between your Raspberry Pi and the outside world, circumventing the limitations of your network's architecture.
Before delving into the intricacies of establishing a reverse SSH tunnel, it's crucial to grasp the underlying principles. SSH, or Secure Shell, is a cryptographic network protocol that provides a secure channel over an unsecured network. It is commonly used for remote login, command execution, and file transfer. When we talk about a reverse SSH tunnel, we're essentially establishing a connection that originates from the remote device (in this case, your Raspberry Pi) back to a server you control. This is in contrast to the standard SSH connection, where the connection is initiated from your local machine to the remote device.
- Sophie Rains Spiderman Video Viral Buzz Truth Revealed
- Explore Maplestar My Dressup Darling Stunning Art Anime
The immediate benefits of this setup are numerous. First and foremost, it bypasses the restrictions imposed by firewalls and NAT configurations, which typically block incoming connections. By initiating the connection from the Raspberry Pi, you effectively "punch a hole" through the firewall, allowing you to establish a secure and encrypted communication channel. Second, it provides an additional layer of security. SSH uses robust encryption algorithms to protect your data in transit, ensuring that your communication remains confidential and tamper-proof. This is particularly important when dealing with sensitive information or when managing a device that handles critical tasks.
The process of setting up a reverse SSH tunnel can be broken down into several key steps. First and foremost, you need to ensure that SSH is enabled on your Raspberry Pi. This may seem like a trivial step, but it's the cornerstone upon which everything else is built. Fortunately, enabling SSH on a Raspberry Pi is a straightforward process. You will typically begin by installing the OpenSSH server package, which provides the necessary tools to establish and manage SSH connections.
Once SSH is enabled, you'll need to create a custom tunnel so that it can be accessed through a service like pitunnel.com. A custom tunnel allows you to access your Raspberry Pi SSH through pitunnel.com with an address like pitunnel.com:12345. The creation of custom tunnels involves entering specific commands into your Raspberry Pi's terminal. Keep in mind that if you are working with the root user, you may need to add "sudo" in front of the commands. Well start by setting up the reverse SSH tunnel on the Raspberry Pi by typing in a command into the terminal. This command will vary depending on the specific tunnel service you choose. The first step of the tunnel setup wizard is to use the type of the connector, choose cloudflared and click next.
- Team Nasdas Porn Watch Now Explore The Hottest Content
- Frieren X Maplestar Anime Parody Sparks Debate
The choice of a specific tunnel service depends on your needs and preferences. Several options are available, each with its own set of features and considerations. Some services offer a free tier with limited functionality, while others require a paid subscription for advanced features or increased bandwidth. When selecting a service, consider factors such as ease of use, security, reliability, and cost. Make sure you change the username with the one you chose for your Raspberry. Some popular choices include Cloudflare Tunnel, and others offer robust support for reverse SSH tunneling.
Another important consideration is the configuration of your Raspberry Pi's firewall. Most operating systems come with a built-in firewall that can be configured to allow or deny specific network traffic. When setting up a reverse SSH tunnel, you'll need to ensure that your firewall allows incoming SSH connections on port 22 (or whatever port you've configured SSH to use). This typically involves adding a rule to your firewall that permits traffic from the IP address of the tunnel server to your Raspberry Pi on the specified port.
Once you have successfully configured the reverse SSH tunnel, you can access your Raspberry Pi remotely from any location with an internet connection. This opens up a world of possibilities. You can securely administer your Raspberry Pi, run applications, access files, and monitor its status. You can use it as a home server, a media center, or a development environment. The possibilities are limited only by your imagination.
Here's how to set up a cloudflare tunnel on the Raspberry Pi. Begin by restarting the SSH service on the Raspberry Pi using the command: `sudo systemctl restart ssh`. After setting up the tunnel, configure your client. Every time the script runs, it will check to ensure there is an active SSH tunnel forwarding traffic from 127.0.0.1:2223 on the proxy back down to port 22 on the Raspberry Pi. To connect to your Raspberry Pi from the internet using the tunnel, use the following command: `ssh user@pitunnel.com -p 12345`, replacing `user` with your username and `12345` with the port the tunnel is forwarding traffic through. This allows you to launch a remote terminal session to your Raspberry Pi. This is similar to an SSH session, but more versatile.
In some cases, you might encounter issues with the tunnel's stability or performance. Common problems include network connectivity issues, incorrect firewall configurations, or conflicts with other services running on your Raspberry Pi. Troubleshooting these issues often involves verifying your network settings, checking your firewall rules, and inspecting your Raspberry Pi's logs for error messages. Don't hesitate to consult the documentation for your chosen tunnel service or seek help from online communities if you need assistance.
In summary, setting up a secure reverse SSH tunnel on your Raspberry Pi is a powerful way to gain remote access to your device, even when it's behind a firewall or a NAT configuration. By following the steps outlined above and selecting a reliable tunnel service, you can establish a secure and encrypted connection that allows you to manage your Raspberry Pi from anywhere in the world. This unlocks a wealth of possibilities, allowing you to leverage the full potential of your Raspberry Pi, whether it's for personal use, professional projects, or educational purposes.
While setting up a reverse SSH tunnel might seem daunting at first, the benefits are well worth the effort. It provides a secure and flexible way to access your Raspberry Pi remotely, empowering you to stay connected and in control, no matter where you are. With the right knowledge and a little perseverance, you can transform your Raspberry Pi into a powerful and accessible tool that can be used for a wide range of applications.
- Fiat Customization Guide Build Price Upgrade Your Fiat Today
- Movierulz Alternatives News You Need To Know 2024
How to SSH into a Raspberry Pi running at home from anywhere in the
![ssh into raspberry pi from anywhere [3 easy steps]](https://tunnelin.com/wp-content/uploads/2020/06/raspberry_pi_ssh-768x576.png)
ssh into raspberry pi from anywhere [3 easy steps]

SSH tunnel to Raspberry Pi
